
Introduction
At ClickHouse Cloud, we love Kubernetes and we run our customer ClickHouse clusters (servers and keepers) in Kubernetes. We use Elastic Kubernetes Service (EKS) for ClickHouse clusters hosted in AWS. Server pods from different ClickHouse clusters can be scheduled onto the same EKS node. We use Kubernetes Namespaces + Cilium for isolation. With EKS clusters being provisioned in new regions to support our customers, our fleet size has been growing considerably, and so have the infrastructure costs for EC2 instances.
To optimize the cost, we analyzed our EKS node utilization. EC2 instances are charged by the hour and not based on usage, so an underutilized node/fleet meant we were leaving money on the table. Costs can be lowered by improving utilization and reducing the total number of EC2 nodes required. Read on to learn how we improved our pod allocation and saved millions of dollars.
Evaluating EKS node utilization
In wanting to make our resource consumption as efficient as possible we undertook an exercise to identify how our pods were allocated. We analyzed CPU/Memory utilization in our EKS cluster nodes. The screenshots below are from eks-node-viewer, a tool to visualize the EKS resources utilization by node.

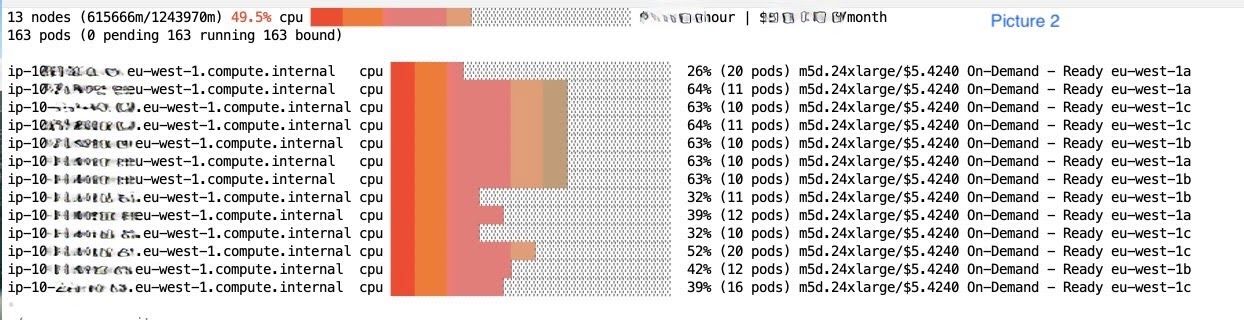
Picture 1 shows the CPU utilization percentage in one of our larger EKS clusters. The entire cluster’s CPU utilization was around 50%. Additionally, many large and expensive nodes (shown in picture 2) were not fully utilized. Based on the eks-node-viewer results for our clusters, we concluded that server pods were not tightly packed among nodes. Two ClickHouse pods that could have been scheduled onto the same node were instead scheduled on different nodes, leading to us needing a higher number of EC2 nodes for the same amount of pods, lower resource utilization per node, and higher fleet costs. CPU/Memory resources on a lot of the nodes in our cluster were mostly idle, but we were still being charged for the nodes.
Root cause analysis
After some investigation, we identified the root cause of the low utilization.
- The Kubernetes default scheduler uses LeastAllocated scoring policy to score nodes when scheduling a pending pod onto available nodes. LeastAllocated scoring policy favors nodes that have a higher amount of resources available, which leads to a sparse distribution of pods on cluster nodes.
- This LeastAllocated scoring policy makes a node scale's scaling down very unlikely. Imagine an old pod is terminated on a node. This node will then be preferred by the scheduler for the new pods to be scheduled. Therefore, the node utilization is hard to drop below the cluster autoscaler's threshold to be reclaimed.
Meanwhile, we also had three additional requirements and constraints for the new solution:
- Increase the resource (CPU/Memory) utilization across our fleet (and reduce our EC2 footprint and costs).
- Do not impact customer experience, such as increasing ClickHouse instance provisioning time.
- Minimize the disruption for our customer's running instances.
Taking these factors into account, we explored a few potential solutions.
Tuning cluster autoscaler and overprovisioning (Abandoned)
One obvious approach is to tune down the cluster autoscaler scale-down threshold. However, this means more customer pods will be evicted frequently, and this did not meet requirement #3 (disruption to customer queries).
We also briefly considered overprovisioning the node by tuning the resource request and limit. However, overprovisioning resources can cause contention. But neither CPU contention (query being throttled) or memory contention (potentially OOM killed) is acceptable in terms of meeting our customer experience.
Proactive packing of pods (abandoned)
We also considered adding the annotation cluster-autoscaler.kubernetes.io/safe-to-evict to ClickHouse pods. This allows the Kubernetes cluster autoscaler to evict pods when a node utilization falls below a certain threshold. However, pod evictions can bring disruption to our customers. For example, a long-running query will be interrupted.
We had already configured the PodDisruptionBudget for ClickHouse servers to limit only one pod in a StatefulSet to be unavailable at any time. But from our experience, making a cluster autoscaler terminate some pods at a random time is still too disruptive for a stateful workload like ClickHouse.
Hence, we decided not to choose this approach.
Bin-packing pods using the MostAllocated scoring policy
Instead, we decided to change the kube-scheduler (default Kubernetes scheduler) scoring policy from LeastAllocated to MostAllocated to pack our clusters more efficiently. This solution implements the bin-packing paradigm for our pods. Why does this help?
- When a new pod needs to be created, the scheduler now prefers a node with a higher utilization ratio. This makes the cluster's overall utilization higher over time.
- When old pods are terminated on a node, that node is less likely to be considered and, therefore, more likely to reach a low utilization threshold. Eventually, the cluster autoscaler can remove this node from the cluster, reducing total cost.
This policy is part of the NodeResourcesFit plugin that is enabled by default in Kubernetes. Once this setting is enabled, during the pod scheduling phase, Kubernetes scheduler performs the following actions:
- First, it identifies the nodes in the cluster that have the resources available, as specified in the pod request spec. This is the "filtering phase."
- Next, it will rank the filtered nodes in descending order of their combined resource utilization (CPU and Memory). This is called the "scoring phase."
- The node picked for the pod will always be the one that can fit the pod and has the highest resource utilization.
With a solution that fits all our requirements, we decided to investigate how to specify this scheduling policy in EKS.
EKS settings support for kube-scheduler customization
As we started investigating how to set this policy for the kube-scheduler in EKS, we discovered that EKS does not have support for customizing the kube-scheduler via EKS settings/config. This feature has been requested by a number of users, but there is currently no indication from AWS about adding support in the near future. Since we couldn’t do this through EKS settings, we opted to set up a custom scheduler ourselves in our Kubernetes cluster.
Custom scheduler with most-allocated scoring policy
In order to set up a custom scheduler for pods in our cluster, we mainly followed the handy guide provided by Kubernetes. Kubernetes lets you create your own scheduler binary as well, though this was not necessary in our case, as the existing kube-scheduler image with the most-allocated scoring policy satisfied our requirements. In order to create this scheduler within our cluster, we took the following steps:
- Built and deployed the kube-scheduler image to our container registry. We couldn’t find a public registry that hosted this image. It is not ideal for us to maintain this image, but there is no alternate solution currently.
- Created a deployment for the scheduler, as mentioned in the guide. In the configMap, we provided the relevant settings for the scoring strategy - ‘MostAllocated’ along with the weights for CPU/Memory when considering the allocation. The profile section of the configMap looked like this:
 profiles:
        - pluginConfig:
            - args:
                apiVersion: kubescheduler.config.k8s.io/v1beta3
                kind: NodeResourcesFitArgs
                scoringStrategy:
                    resources:
                        - name: cpu
                          weight: 1
                        - name: memory
                          weight: 1
                    type: MostAllocated
              name: NodeResourcesFit
          plugins:
            score:
                enabled:
                    - name: NodeResourcesFit
                      weight: 1
          schedulerName: <schedulerName>
- In order to ensure high availability, we chose to define three pods in our custom scheduler deployment, with leader election enabled, so that only one pod would do the active scheduling with the other two pods on standby.
- We deployed this scheduler to our cluster and then updated our pods to use this most-allocated scheduler by specifying the schedulerName in the PodSpec.
With this setup, we could ensure that the throughput of scheduling is similar to the existing kube-scheduler, as well as having redundancy built into the custom scheduler setup. We can also increase the cluster resource utilization with minimum disruption.
System utility workloads
Our EKS cluster has a few system pods that are responsible for utility workloads, such as CoreDNS, ArgoCD, Cilium Cluster Mesh, etc. Sometimes, these are the only remaining pods on a low-utilization node. The cluster autoscaler has problems evicting some of these because they use local storage. These occupied nodes, in turn, can’t be scaled down.
To solve this, we annotated all such system utility workloads with safe-to-evict: true.
Over provisioning for smoother scale out
The EKS cluster autoscaler pod itself can also block a node being reclaimed. For the autoscaler, we chose to make it run on a small node instead of configuring safe-to-evict: true. This provided better stability.
In ClickHouse Cloud, we use an overprovisioning workload recommended by the EKS cluster autoscaler. We create workloads with similar resource requirements but lower PriorityClass. This lower priority allows the eviction of the overprovisioning pods for the ClickHouse pods.
We noticed that when overprovisioning pods use the default-scheduler, and ClickHouse pods use the custom scheduler, the preemption does not work. Because each scheduler only preempts the pods scheduled by itself. In this case, the cluster autoscaler also falsely thinks that scaling up is not needed. To solve this and make things more consistent, we made the overprovisioning pods also use the custom scheduler.
Testing and rollout
In order to ensure no performance degradation with the custom scheduler, we also conducted some pod scheduling stress tests. We created a job to continuously create pods to be scheduled by the custom scheduler. We then killed the custom scheduler pod that holds the lease lock. We observed that other scheduler standby pods quickly took over. The pod scheduling was not impacted significantly, and the throughput of scheduling was also not a concern based on our tests.
Another potential risk was the increasing of the pod cold start-up time. Now that clusters are more packed, in theory, new instance creation is more likely to trigger a nodegroup scale-up to schedule the pending pods. In order to observe this, we measured the P90 and P99 cold start-up times to check the impact. We verified that this impact is negligible. This can be due to node provisioning for accommodating ClickHouse service does not happen frequently enough to have a big impact.
When it came to the final rollout, we still proceeded with caution:
- We rolled out the scheduler change region by region and started with a few small regions.
- Within a single region, we first only updated smaller ClickHouse instances before gradually applying this scheduler to all the instances in the cluster.
- Once the pod spec is updated with this custom scheduler for ‘schedulerName’ field, running Clickhouse pods will be rescheduled using the new scheduler. Since we already configured our stateful sets with a pod disruption budget along with graceful shutdown (to avoid disrupting running queries), we did not experience any disruption for our customer instances when scheduler was changed. After this one time rescheduling, running pods will never be affected again by scheduler change which satisfies requirement #3 in a way previous solutions do not.
Cluster Utilization After Rollout
As a direct result of these changes, cluster utilization went up to 70%.

We noticed about a 10% reduction in the number of nodes, with the highest savings coming due to a few large 24xl nodes being cleaned up. Together with the large node reduction, we achieved more than 20% reduction in EC2 cost.
Finally, we also cross-referenced with our AWS Cost and Usage Report, which confirmed a similar amount of savings.
Conclusion
To summarize, we significantly reduced our EKS infrastructure cost by changing the Kubernetes scheduler scoring policy to MostAllocated. We achieved this by setting up a custom scheduler (kube-scheduler image with MostAllocated scoring policy) in our EKS clusters. This approach nicely balanced both cost reduction and maintaining the stability of our customers’ workloads. We also thoroughly annotated a few preemptable system workloads to ensure nodes can be timely reclaimed.
For us, the success of this project was measured in cost savings achieved as well as having no drop in reliability or performance for customers.
With the aforementioned changes, we were able to increase our EKS cluster resource utilization by 20 - 30% and also achieve commensurate cost savings on EC2 instances in our EKS clusters.